Shock rebuilding.

Five.five-six

New member
Joined
May 6, 2021
Messages
494
Reaction score
341
If not time, it’s getting close to time to rebuild my FOX 2.0’s I watched some youtube videos so I’m pretty much an expert now .. OK I just watched one video.  

I’ll need:

snapping players or a pick

Something to grab the Schrader valve to pull the reservoir caps out,   

IFP removal tool

oil

rebuild kit

nitrogen bottle and filler gauges thingy 

probably some more youtube. 

What else and I missing?

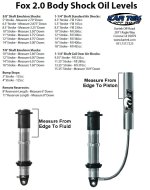
I need to figure out what torque setting to crank the shaft retaining nut to and I need the specification for how deep to set the IFP when I fill the shock with oil.

Seems the tools, oil and seals are going to cost about the same as having them professionally rebuilt but then I own them and I can bead blast or possibly powder coat the body of the shocks. 

What am I missing?

 
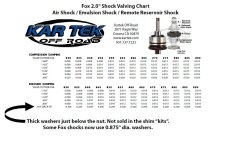
Your list looks great. Bench vice is a must with some aluminum or plastic jaws or jaw covers. For 2.0's a good pick to get the snap rings out. Any larger size shocks a good pair of internal snap ring pliers are worth their weight in gold. Kartek has good prices on rebuild kits and shims.

Fox 2.0 valving chart.jpg

2.0 oil levels.jpg

 
I have a mounted bench vice, I guess I need plastic jaws.   

How big of bottle of oil might I need, the shocks are the same ones the car left Larry's shop with. 

Also, how big a bottle of nitrogen do need? 

 
For holding my 2.0s I drilled a 2 inch hole in a piece of 2x4, then cut it in half and used those in the vise to hold the shock in place. As for the nitrogen tank I think mine is about 40 cubic feet and it’s enough for several rebuilds. I believe fox has tables on their site, or at least floating around on the internet somewhere, that show how much oil you need for your specific shocks.

 
I am no expert but I do alot of shocks (not that I want to ..)  All the tools you mentioned are important in addition to standard mechanics tools. Add to your list : A smartphone - take Pics and Videos as they come apart, the first couple times it helps.   Get a folding table and cover it with Paper towel or I use the lint free blue mechanics towels, and do one shock at a time and lay the pieces out as the come out of the shock and resi.   then Video it  - I like the Blue towels because I can measure all the shims and Use a sharpie to write the info down right on the  Towel for reference  - this way I know the valving.  especially helpful if you don' t do them all in in one day and need to leave stuff overnight and forget stuff.

As others have said a good Bench vise is key - soft jaws work great  - a Shock vise jaw set if you want to spend $200 or more ...it is worth it  - If you are not careful and a big guy you could easily distort the shock housing tightening the vise and then its junk out of round.   I have a trick I use - I "borrowed forever" One of the Wife's Jar opener gripper rubber thingy.  I put it in the soft jaws and it stops the shock from turning with far less pressure on the body and stops scratches.  I clean the shock bodies with Isopropyl alcohol before I grip them as well. Some people use painters tape for the same reason, but shock oil makes that slick. 

Shocks are like doing an engine or anything else with tolerances and machined surfaces - clean everything super clean on assy. and make sure all the internal surfaces have no scratches or grooves - I use a Bright LED  light and look well. If you do have scratches /grooves  - replace the pieces its cheaper in the long run. I never rebuilt set where this is the first rebuild  is likely to be perfect,  usually poor assy cleanliness that ruins the surfaces.  And don't worry if the shock oil looks like dirty motor oil with silver specks in it.  Buy the Shock oil the company uses - Like King for King, Fox for Fox etc.  The Fox is Red, King is clear.

You will also need rebuild kits and I also replace the Schrader valves as a good practice.  On Kings I find 1/2 the time the Uniballs in the shock ends rattle  - so I change them too as cheap insurance. I  lubricate all the seals in shock oil while assembling, In the old King Building, they let me watch some of the guys assemble shocks, I learned some, getting seals on and off without scratching the aluminum pieces or Shock body is key. and not as easy as it looks, use a sharp pick and you will dig into everything.

Also shocks are under pressure - be really careful and make sure they are Fully depressurized Before pulling them apart and wear Safety glasses - I know it sounds stupid   - I wheelie at 100MPH with no helmet but wear safety glasses building shocks ...  Oil in the eye hurts.  Some people wear gloves, I just use thin Nitrile gloves, but Mechanics gloves can stop a pinched finger during re -assy

Always after depressurizing make sure the shock will fully close with no pressure. It's possible for the IBP to let Nitrogen past the seal and not back. It the shock is not completely soft, don't take it apart - you could die. 

Lastly for me, burping the shock to get all the air out takes some time, but it really important 

I think the FOX shocks are easier to do than the Kings, but you still need to take you time and replace all the seals. 

 
Last edited by a moderator:
I use shockseals.com not my company, not getting any kickbacks, but its where I get mine. Better price, and quick shipping. Usually they throw in a coozie too. 

 
Pick up a gallon of fox shock oil it will last a while.I made a piston puller for resevoir just used an all thread with same threads then a flat piece of steel drilled a hole in it to set on open end of resevoir.

Besides that its an easy job actually done a few for our cars in camp.Did bypasses last time not much different than regular shocks IMO.As for refilling nitrogen i found it easier to run to makenzies pay the 10 per shock.Here in peoria i get them filled for 5 per shock thinking of getting my own bottle though since i am the camp shock guy now LOL.And i like to revalve and adjust mine too.

 
I like having my own Shock fill set up - Or having someone in camp that has one you can use - like having a boat, the best boat is your friends boat ...  I like to fill the shocks with 50 lbs first  after a rebuild just to make sure they don't "pop"  then I go to 150 and leave the shocks sit overnight  and I check them after - if they are with 1-2Lbs they are good to go (you always lose a bit of air even with no loss chucks) if they leaked down they are coming back apart -never happned to me but I have seen it happen to others

Also remember always to fill shocks (when on the car) when the shocks are fully expanded Not a ride height. And It's always good to keep them topped off for performance and cooling. 
I read somewhere to fill them on the bench to full pressure and once they are on the car at ride height, check their pressure at ride height and make a note of it, then you can top them off to the ride height pressure on your car.  

Seems like super super clean is the key.  My FIL brought me a roll of the lent free shop towels when I went through his banshee after years of sitting (one kick cold start a again) and I thought gee, what a cheepo thin towel.. but now I really like them after replacing my rear wheel bearings.  That job was a PITA.       
I always pressure test them on the bench (fill and leave)  then remove some pressure to make them easily to install on the car and refill them.

Clean in just about any "piston/cylinder" rebuild is really important IMO

 
I am no expert but I do alot of shocks (not that I want to ..)  All the tools you mentioned are important in addition to standard mechanics tools. Add to your list : A smartphone - take Pics and Videos as they come apart, the first couple times it helps.   Get a folding table and cover it with Paper towel or I use the lint free blue mechanics towels, and do one shock at a time and lay the pieces out as the come out of the shock and resi.   then Video it  - I like the Blue towels because I can measure all the shims and Use a sharpie to write the info down right on the  Towel for reference  - this way I know the valving.  especially helpful if you don' t do them all in in one day and need to leave stuff overnight and forget stuff.

As others have said a good Bench vise is key - soft jaws work great  - a Shock vise jaw set if you want to spend $200 or more ...it is worth it  - If you are not careful and a big guy you could easily distort the shock housing tightening the vise and then its junk out of round.   I have a trick I use - I "borrowed forever" One of the Wife's Jar opener gripper rubber thingy.  I put it in the soft jaws and it stops the shock from turning with far less pressure on the body and stops scratches.  I clean the shock bodies with Isopropyl alcohol before I grip them as well. Some people use painters tape for the same reason, but shock oil makes that slick. 

Shocks are like doing an engine or anything else with tolerances and machined surfaces - clean everything super clean on assy. and make sure all the internal surfaces have no scratches or grooves - I use a Bright LED  light and look well. If you do have scratches /grooves  - replace the pieces its cheaper in the long run. I never rebuilt set where this is the first rebuild  is likely to be perfect,  usually poor assy cleanliness that ruins the surfaces.  And don't worry if the shock oil looks like dirty motor oil with silver specks in it.  Buy the Shock oil the company uses - Like King for King, Fox for Fox etc.  The Fox is Red, King is clear.

You will also need rebuild kits and I also replace the Schrader valves as a good practice.  On Kings I find 1/2 the time the Uniballs in the shock ends rattle  - so I change them too as cheap insurance. I  lubricate all the seals in shock oil while assembling, In the old King Building, they let me watch some of the guys assemble shocks, I learned some, getting seals on and off without scratching the aluminum pieces or Shock body is key. and not as easy as it looks, use a sharp pick and you will dig into everything.

Also shocks are under pressure - be really careful and make sure they are Fully depressurized Before pulling them apart and wear Safety glasses - I know it sounds stupid   - I wheelie at 100MPH with no helmet but wear safety glasses building shocks ...  Oil in the eye hurts.  Some people wear gloves, I just use thin Nitrile gloves, but Mechanics gloves can stop a pinched finger during re -assy

Always after depressurizing make sure the shock will fully close with no pressure. It's possible for the IBP to let Nitrogen past the seal and not back. It the shock is not completely soft, don't take it apart - you could die. 

Lastly for me, burping the shock to get all the air out takes some time, but it really important 

I think the FOX shocks are easier to do than the Kings, but you still need to take you time and replace all the seals. 
Can you recommend a nitrogen setup?  There are so many choices.  Do I need the snap on quality or if I’m just rebuilding every other year and being camp nitrogen bitch is the harbor freight quality good enough?  I am a buy once cry once kind of guy but I don’t want to waste money on more than I need.  As for the shock jaws, I’ll probably make some out of 2X4 ... then again it’s the price of lumber the real thing might be cheeper these days LOL

 
Every fill system is a little different. Each time you go to check pressure with mine I lose a little pressure. I always put shocks  on car, raise car so tires are just off the ground and fill to desired setting.

 
Did the same for mine, except I went to a welding store for parts. My bottle, don't know the volume but is about 24" tall. I have never in 8 years refilled it.

 
Can you recommend a nitrogen setup?  There are so many choices.  Do I need the snap on quality or if I’m just rebuilding every other year and being camp nitrogen bitch is the harbor freight quality good enough?  I am a buy once cry once kind of guy but I don’t want to waste money on more than I need.  As for the shock jaws, I’ll probably make some out of 2X4 ... then again it’s the price of lumber the real thing might be cheeper these days LOL
I built my Nitrogen setup like others have - it's not really cheaper in the end, but It works the way I want it to.  The main issue is to get a no-loss chuck 

While they seem like a PIA to haver to screw on and open and close - there is so little Nitrogen in the shock, any other way and you will lose too much. 

If you keep the lines shorter from tank to gauge/chuck you "waste" less Nitrogen, but a small tank goes a long way.  I spent the money on good gauges since the rig sits more than gets used and travels with me  - I bought some amazon Uniweld USA made 

https://www.amazon.com/Uniweld-RHP400-Nitrogen-Regulator-Connection/dp/B008HQ6GXO/ref=pd_bxgy_3/134-7688111-0027268?_encoding=UTF8&pd_rd_i=B008HQ6GXO&pd_rd_r=df07619c-f0c9-4c35-acb0-ac9768f365f5&pd_rd_w=vVTRH&pd_rd_wg=kl56Y&pf_rd_p=fd3ebcd0-c1a2-44cf-aba2-bbf4810b3732&pf_rd_r=VNMGJ858PT0DCATAB5ZE&psc=1&refRID=VNMGJ858PT0DCATAB5ZE

the slickest setup I have seen is this one - One of our crew has it and its the go to for all of us in the dunes ...

https://powertank.com/products/sig-5700

 
Back
Top