Minor Makeover

Slowly but surely making some progress. All 8 shocks were rebuilt by King and back on the car. Howe rebuilt the power steering rack and I got that installed. 
 

080116D3-EF8D-4708-BFEE-1304E429FF79.jpeg

7BC5C970-6AAF-4877-88E5-D3D3F8DE2E9D.png

 
I’ve been working on few things this week. Mainly fixing little things that I didn’t like. A trans vent tube that was way too short and wiring that could result in some chafing if not addressed. The OEM ECU mounted in the wing trunk moved around so I added another strap to secure it. That kind of time consuming stuff.
 

Attachments

  • 90EC6654-A5F9-45E9-9F08-DEEF39998BDA.jpeg
    90EC6654-A5F9-45E9-9F08-DEEF39998BDA.jpeg
    318.7 KB · Views: 10
  • 777D5535-724F-4102-8EFB-2A98B8F2BDB3.jpeg
    777D5535-724F-4102-8EFB-2A98B8F2BDB3.jpeg
    289.3 KB · Views: 10
The big stuff makes for great progress pictures. The small details are time consuming and a lot of people won’t even notice them. Looking forward to seeing the finished car.
 
  • Like
Reactions: FOG
Yeah I don't miss Polishing Buggy wheels at all..
 
  • Haha
Reactions: FOG
Here ya go.
But I have another problem……. now I have to polish the old fronts.
Little sisters truck wash off of I10 in thousand palms does really good polishing.
 
  • Like
Reactions: FOG
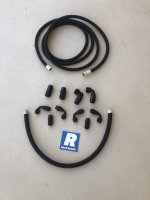
I decided to replace all my fuel lines. Some were starting to crack and they were probably 20 years old like the car. After some research and discussion I went with AN compression fittings as I did on my last sand rail but instead of stainless steel braiding I chose nylon.
Alex @Fullthrottleguy was very helpful and is a site sponsor with the XRP fittings and hose I wanted.
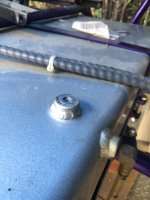
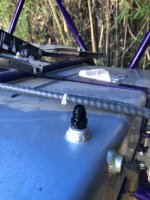
When I removed the fuel return line from the top of the tank I noticed that the threads were stripped on the welded in AN fitting. It’s always something right? Anyway I got a new NPT fitting from Race Ready along with the other stuff.
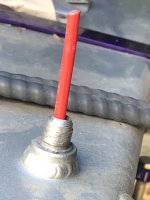
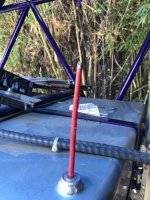
My plan was to try and keep as much of the aluminum bits from getting into the tank as possible when I cut the top of the fitting off and tapped the hole. Fortunately under the return fitting was the tank outlet fitting at the bottom. So I got a piece of wire and pushed it up from the bottom and through the top fitting. Greased it up and pulled it back through the fitting just below where I planned to cut it off. Cut the top part of the fitting off and then pushed the wire back up the hole and cleaned it off.
I did the same thing when I drilled and tapped the hole. I also used a lot of grease on the tap, removing, cleaning and re-greasing it several times during the process.
 

Attachments

  • 1037019D-1854-45C3-BFA6-2E006B0FDD08.jpeg
    1037019D-1854-45C3-BFA6-2E006B0FDD08.jpeg
    2.3 MB · Views: 21
  • 0304E49D-05CC-4CA6-B03C-A42822D219D1.jpeg
    0304E49D-05CC-4CA6-B03C-A42822D219D1.jpeg
    825.1 KB · Views: 21
  • E74D7EB9-5EA9-402C-9B38-860C00A42AE6.jpeg
    E74D7EB9-5EA9-402C-9B38-860C00A42AE6.jpeg
    1.4 MB · Views: 19
  • C7EEEDAB-5FDB-47E8-9676-96C6C9674A92.jpeg
    C7EEEDAB-5FDB-47E8-9676-96C6C9674A92.jpeg
    1.6 MB · Views: 20
  • B44CFB59-C1E4-422B-B2E8-39A1D663C382.jpeg
    B44CFB59-C1E4-422B-B2E8-39A1D663C382.jpeg
    1.4 MB · Views: 21
Finished putting all the fuel lines together and installing them.
No leaks!
I also added a shutoff valve and a “T”. So now I can change filters etc. without making a big gas mess and drain the tank when needed.
The 90* elbow coming out of the bottom of the fuel tank was bent from the skid plate hitting it. I replaced it with a forged fitting and added some spacers between the skid plate and frame to give it more clearance plus adding another layer of aluminum sheet to give it more strength.
 

Attachments

  • 97550333-B05C-4A3C-98D4-EEE3556494C8.jpeg
    97550333-B05C-4A3C-98D4-EEE3556494C8.jpeg
    1.4 MB · Views: 14
I have installed the Fumoto oil drain valve on my previous sand cars and I like how it reduces the mess during oil changes. So I decided to do the same with this car. But the bottom tube is too close so I can’t get it started. Once it’s threaded all the way in, it looks like there will be enough clearance.
I’m thinking if I unbolt the motor and trans and jack them up about an 1/8” I can get it threaded in. Lots of nuts and bolts. Or remove the oil pan and then install the valve and reinstall the oil pan.
Then my mechanic @RIDERED suggested to grind the edge off of the valve where it’s hitting the tube. Much easier than my ideas.
Got it installed but I had to grind very close to the “C” clip that holds the spring to keep the lever locked in the closed position. So I gooped some JB weld on top of the clip and housing for some added security.
 

Attachments

  • F8114E56-C1A8-4DB1-9529-5CD5050B5A63.jpeg
    F8114E56-C1A8-4DB1-9529-5CD5050B5A63.jpeg
    1.4 MB · Views: 28
Finished putting all the fuel lines together and installing them.
No leaks!
I also added a shutoff valve and a “T”. So now I can change filters etc. without making a big gas mess and drain the tank when needed.
The 90* elbow coming out of the bottom of the fuel tank was bent from the skid plate hitting it. I replaced it with a forged fitting and added some spacers between the skid plate and frame to give it more clearance plus adding another layer of aluminum sheet to give it more strength.
Looks great and secure!
 
  • Thanks
Reactions: FOG
Ken I think you guys need to go fill the fuel tank and you and brad go do a Test day at mama G b4 Vets weekend and if all good just put her inside the trailer.
 
Back
Top