Country Coach intrigue 32 ft (((((Solar install)))))

I really like how this guy mounted his panels on the roof using strut channel. A little more work and adds a little more weight but I like the idea of being able to add a strut rod to manually angle a panel up if you want. Not that I plan on doing that but would like to have that option. That part of his install starts at 4 minutes. I will be doing it this way.
 
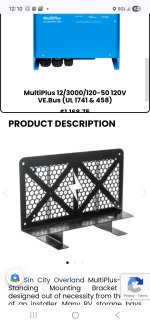
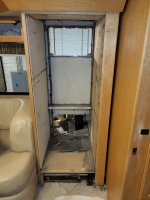
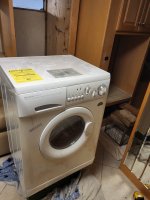
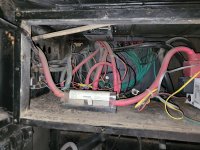
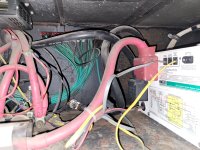
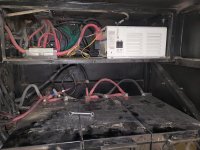
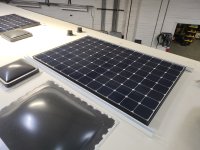
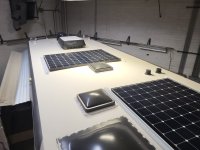
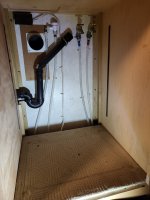
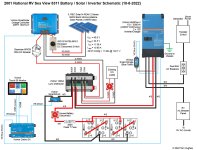
Trying to mount my electronics in the same Bay with the batteries was going to be a real pain in the ass. To do it right I needed to separate the AGM starting battery from all the electronics. Elected to mount all of the electronics under the bed in the storage area. I will cut a rectangular opening in each side and put a regular AC register vent to let some air flow through that area. From what I gather as long as I'm not running AC units with this inverter it will build some heat but not get crazy hot. Going with the multiplus II 12 volt 3000 VA inverter. For the price point without going absolutely nuts everything I gather Victron has really good products. Controller will be a victron MPPT 150/45. Selecting the correct controller is extremely important to make the system as efficient as possible. My battery guy who is a tech wizard helped select the controller. He said victron controllers don't scale correctly and rattled off enough numbers to make my head spin. You look online and think you are able to figure out how to select the right one and then I just threw all that out the window and gave up. Then also mounted in that area will be Victron Serbo that lets all the components talk to each other. The brain of the system so to speak. The batteries I bought also talk to the Victron components through cables. Components are just sitting there for the photo it will need to be mounted up higher to get air around them. This location keeps them away from the sand during a big storm at glamis as well. This inverter does add 40 lb but I still figure with the whole system I'm going to be 180 lb lighter
Are you planning on using a touch screen with the Cerbo? All your devices can communicate via a Bluetooth (if equipped) network if you prefer.
 
Are you planning on using a touch screen with the Cerbo? All your devices can communicate via a Bluetooth (if equipped) network if you prefer.
Did not know this was an option. I do know with these batteries the BMS is very advanced and I won't need a shunt. Will be able to bluetooth to the battery program. Still have a lot more to learn and research in this regard.
 
Here is the video on the batteries I bought. I glanced at this video before purchase but need to go back and really watch it to understand.
 
At 15.20 he starts talking about the communication with the Victron components.
 
How goes the install? Just finished the battery upgrade on my coach. Next weekend will be the PV panel install, hopefully.
 
How goes the install? Just finished the battery upgrade on my coach. Next weekend will be the PV panel install, hopefully.
Both of my forklifts were down so today I had to do repairs. New tube on one front tire of one and hydraulic hose on the other. I had some heavy duty strut channel laying around so I just cut that and used it. Got some white paint on it. Tomorrow ready to start installing the panels on the roof. I'm going to have to mount my inverter sideways. Found a company that sells a cool bracket online but for $340 I will make my own. I'm not sure how all the wiring is going to get hooked up yet. Here is the inverter in the coach now and has 4/0 cables coming out of it. There are two big ground wires coming from it. I need to trace some of those wires down and figure out where they go. It currently has a 300 amp fuse but per my manual I ordered a 400 amp. I bought a 10 cubic foot insignia fridge this week which just fits in the hole. Realized with the swing of the door and the hinge I'm going to have to pull it out and protrude the doors out a couple inches. So I returned it to Best buy and ordered a 11.6 cubic foot GE. Basically a zero tolerance fit so we will see how to get that thing in there. Nowhere to see it in the store so I have to buy one to measure it. Says it is 24 in wide and that is how wide my opening is. I may have to cut or slightly sand the edge of the wood. Have to removing the styrofoam I have another half inch to play with. Washer dryer unit goes and I'm turning that into storage. my buddy owns diamond Auto Glass and he's going to have his guys come out and pull the right front glass.
 

Attachments

  • 20250814_133001.jpg
    20250814_133001.jpg
    3.5 MB · Views: 13
  • Screenshot_20250813_121016_Chrome.jpg
    Screenshot_20250813_121016_Chrome.jpg
    746 KB · Views: 11
  • Screenshot_20250813_121025_Chrome.jpg
    Screenshot_20250813_121025_Chrome.jpg
    498.7 KB · Views: 12
  • 20250811_071702.jpg
    20250811_071702.jpg
    1.7 MB · Views: 11
  • 20250811_071716.jpg
    20250811_071716.jpg
    1.8 MB · Views: 10
  • 20250811_090539.jpg
    20250811_090539.jpg
    1.4 MB · Views: 13
  • 20250813_132630.jpg
    20250813_132630.jpg
    3.7 MB · Views: 13
  • 20250813_132623.jpg
    20250813_132623.jpg
    3.9 MB · Views: 13
  • 20250813_132616.jpg
    20250813_132616.jpg
    4.3 MB · Views: 14
  • 20250814_133847.jpg
    20250814_133847.jpg
    2.6 MB · Views: 14
  • 20250814_133843.jpg
    20250814_133843.jpg
    2.5 MB · Views: 13
  • 20250814_133432.jpg
    20250814_133432.jpg
    3.6 MB · Views: 13
Top one is my inverter. Also instructions from Steve when I bought the original kit from him years back. I'm almost positive my battery guy told me I need to hook these up in series. Still need to check on that. Also thanks Dave for recommending fuses versus breakers. Need to figure out what size on my fuses and where to put them in the system.
 

Attachments

  • 20250813_133501.jpg
    20250813_133501.jpg
    3.2 MB · Views: 4
  • 20250813_133451.jpg
    20250813_133451.jpg
    3.3 MB · Views: 4
  • 20250813_133300.jpg
    20250813_133300.jpg
    3.3 MB · Views: 4
Also reading in several different forums everybody said to run the Staubli mc4 connectors. These are the connectors that attach the wiring to the panels together. A lot of people said do not mix and match connectors even though they will click together. Apparently there have been some issues with wiring burning up. Not sure where my wiring is going to go through the roof but I'm guessing it will be something like this. Roof on the country coaches are 5 in thick.
 

Attachments

  • Screenshot_20250814_151554_Chrome.jpg
    Screenshot_20250814_151554_Chrome.jpg
    535.4 KB · Views: 4
  • Screenshot_20250814_151908_Chrome.jpg
    Screenshot_20250814_151908_Chrome.jpg
    426.3 KB · Views: 4
This is the cabinet where the plumbing was behind the washer and dryer. I need to delete or somehow plug the hot and cold so the faucets aren't protruding also need to cap off that drain because that p-trap will dry up and smell at some point. I thought I read in all my paperwork this thing has poly butylene plumbing which does not thrill me. Being in real estate for 32 years I have dealt with plenty of that in homes. Of course there was a class action lawsuit on that crap. Then I will have to put a board to cover this all up and then put shelving in there.
 

Attachments

  • 20250811_090505.jpg
    20250811_090505.jpg
    2 MB · Views: 3
Both of my forklifts were down so today I had to do repairs. New tube on one front tire of one and hydraulic hose on the other. I had some heavy duty strut channel laying around so I just cut that and used it. Got some white paint on it. Tomorrow ready to start installing the panels on the roof. I'm going to have to mount my inverter sideways. Found a company that sells a cool bracket online but for $340 I will make my own. I'm not sure how all the wiring is going to get hooked up yet. Here is the inverter in the coach now and has 4/0 cables coming out of it. There are two big ground wires coming from it. I need to trace some of those wires down and figure out where they go. It currently has a 300 amp fuse but per my manual I ordered a 400 amp. I bought a 10 cubic foot insignia fridge this week which just fits in the hole. Realized with the swing of the door and the hinge I'm going to have to pull it out and protrude the doors out a couple inches. So I returned it to Best buy and ordered a 11.6 cubic foot GE. Basically a zero tolerance fit so we will see how to get that thing in there. Nowhere to see it in the store so I have to buy one to measure it. Says it is 24 in wide and that is how wide my opening is. I may have to cut or slightly sand the edge of the wood. Have to removing the styrofoam I have another half inch to play with. Washer dryer unit goes and I'm turning that into storage. my buddy owns diamond Auto Glass and he's going to have his guys come out and pull the right front glass.
The green ground wire is a bond wire for the inverted AC. It should be attached to the frame of the Moho somewhere. You may find it attached to the frame along side the bond wire from the gen set and main electrical panel. Hard to see in the picture but where is the second ground?
 
Top one is my inverter. Also instructions from Steve when I bought the original kit from him years back. I'm almost positive my battery guy told me I need to hook these up in series. Still need to check on that. Also thanks Dave for recommending fuses versus breakers. Need to figure out what size on my fuses and where to put them in the system.
Are you referring to your batteries or PV panels in series?
 
Also reading in several different forums everybody said to run the Staubli mc4 connectors. These are the connectors that attach the wiring to the panels together. A lot of people said do not mix and match connectors even though they will click together. Apparently there have been some issues with wiring burning up. Not sure where my wiring is going to go through the roof but I'm guessing it will be something like this. Roof on the country coaches are 5 in thick.
Staubli connectors are the best and you should not mix brands. Equally important is to use the proper crimping tool. There was/is a video online used to certify installers using Staubli connectors. You can also buy PV cable with connectors already installed. PV cable comes in different strand counts and the fine strand (150) is the way to go IMO.
 
The green ground wire is a bond wire for the inverted AC. It should be attached to the frame of the Moho somewhere. You may find it attached to the frame along side the bond wire from the gen set and main electrical panel. Hard to see in the picture but where is the second ground?
Let me look today. Still getting oriented where everything is in this coach. Also today I am going to try find the transfer switch and AC breaker panel. I now most have everything in this diagram except the Victron Lynx. Wonder if I should just purchase that and be done with it? Also no shunt or monitor since that can be accessed from the BMS in the batteries. I have a 400 amp fuse coming for the batteries. Have one shut of switch but looks like I need a heavy duty one for that as well. Currently where my 4/0 wires come out of the existing inverter is probably 4' from the new inverter location. Although once disconnected I may be able to shorten that gap a little. Can I use a short 4/0 jumper and go to a junction. Or should I run all new wire?
 

Attachments

  • 2001-sea-view-battery-solar-inverter-wiring-10-8-2022-web.jpg
    2001-sea-view-battery-solar-inverter-wiring-10-8-2022-web.jpg
    277.2 KB · Views: 5
Where the inverter, cerbo, and charge controller mount under the bed will be vented with large grates on both ends. Thinking I may still want a temp controlled fan in that area as well. Assuming I need to run a 120 outlet into that area to plug in? Not sure what fan to buy. Quiet would be good since it is under the bed. Although at night with just the fridge running not sure the inverter would build any heat. Here are the specs on that GE fridge. If I run some 12 ga 3 wire to a plug it will be under the coach exposed and need to be in conduit and boxes.
  • Electrical Specification​

    Amperage
    15 amperes
    Voltage
    120 volts
    Estimated Annual Electricity Use
    310 kilowatt hours
    Estimated Annual Operating Cost
    37 United States dollars
 
Also for now I decided NOT to run a DC to DC converter and charge the new batteries from the alternator. It will only charge the starting battery. Coach batteries will be charged with solar, gennie, shore power.
 
Also for now I decided NOT to run a DC to DC converter and charge the new batteries from the alternator. It will only charge the starting battery. Coach batteries will be charged with solar, gennie, shore power.
Same here as I didn’t want to cook my alternator. Your multi plus does have a 4 amp trickle charger for the starter battery. Single positive wire from the charger to a positive post at the starter battery. Fuse this wire at the battery.
 
Back
Top