2" Hollow Hub/Bearing Assembly question

MPC

Member
Joined
Jan 18, 2023
Messages
30
Reaction score
20
I am converting my buggy from combo spindles to 2" hollow spindles with disc brakes.  The race on the inboard side of the hub gets hung up on a slight lip; the lip the pencil is pointing to in the picture.  I assume the race and bearing should be going all the way down to the bottom to fully seat.  If so, what would be the preferred method to get it all the way into position?

I have been putting the race in the freezer (15 minutes or so) and that hasn't got it past the small lip.  Maybe I just need to leave it in overnight??

I'm hesitant to beat it into place and damage the race.  Should I deburr it with a rotary tool/sand paper?

Both hubs have the same small lip.  Thanks
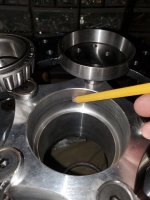
hub lip.jpg

 
I heat up the hub for 30 seconds with a map gas torch from HD, then they seem do drop in on the Latest Rage Brakes,  looking at the Bolt pattern on the disc they look like the old Kartek or Latest rage, 

 
Put the hubs in the oven at 300 degrees for 20 minutes and races in the freezer overnight. They will drop right in.

Good luck

 
Put the hubs in the oven at 300 degrees for 20 minutes and races in the freezer overnight. They will drop right in.

Good luck
This is what I had thought would work. Just didn't know time frame for race in freezer.

 
Put the hubs in the oven at 300 degrees for 20 minutes and races in the freezer overnight. They will drop right in.

Good luck
Sorry for being ignorant but why should anybody go through this BS?? Is it a design flaw or is it intended to be tighter than a gnats arse? I thought when you buy all new parts that should just assemble easily. 

 
Sorry for being ignorant but why should anybody go through this BS?? Is it a design flaw or is it intended to be tighter than a gnats arse? I thought when you buy all new parts that should just assemble easily. 
Agree, and if this is what was intended, why not include some assembly instructions.

 
A bearing race is held in place with an interference fit, the amount of interference is determined by the material of the bore. It is not a design flaw or mistake in machining. An aluminum bearing race driver will install a race in completely with a few well-intentioned strikes from a 24oz ball-peen hammer. Heating the bore and chilling the race will make it somewhat easier but not necessary at all. I've been a professional auto mechanic for 35 years and have installed thousands of bearing races, none of which did I ever have to resort to thermal expansion or contraction to get them in.  Beat that bitch in with the appropriate race driver and be done with it. If you need to you can soften the edge of the lip with some emery cloth. What troubles me more than installing the race, is getting it out. There really should be 2 reliefs in the bottom of the bore so you can use a steel drift from the backside to remove it, otherwise it's near impossible to get a race out. 

This will work for the application if you will only use it once in a while. I have a Blue-Point but I don't see the benefit of spending the money on anything more than what Amazon sells.

Amazon.com: Orion Motor Tech Bearing Press Kit, 10pc Bearing Race and Seal Driver Set with Seal Driver and 9 Bearing Adapters, Seal Installer Bearing Driver Kit for Bearing Installation : Automotive

 
Sorry for being ignorant but why should anybody go through this BS?? Is it a design flaw or is it intended to be tighter than a gnats arse? I thought when you buy all new parts that should just assemble easily. 
Dont want to go through this then stop supporting the cheapest Chinese parts.  Why do you think the price is $900 compared to $2000.  it takes 92 seconds to heat the brake and drop in the race, 

These is Everday stuff but  its not really BS, we are now in a generation, if it can be done from a keyboard then no one knows how to work on something ( pick up your SXS and drop it off at the dealer, then pick up your SXS and drop it off at the dealer ).  it a sad world we live in,  in the 90's this was just normal stuff,  

This process is for all aftermarket brakes, trailer hubs, older cars.  Every Latest rage brake that we have installed races in,  (looking at invoices 48 of them) when checked was within .0005 of the correct press.  

It does not get any easier than this,  

Agree, and if this is what was intended, why not include some assembly instructions.
Really should be common sense.  i am not being mean, but this is standard procedure for putting in a race of that size,  

 
^^^Yes agreed it is basic mechanical assembly. But to the un-knowing weekend warrior (no offence to anyone) it can be a daunting task.

And another thought, tapered roller bearings only lubricated with grease cannot have much preload on them, after seating the bearings with your pin spanner (you have a pin spanner right?) loosen the nut and then retighten it until the nut stops, you can move the nut back and forth several times to get a feel for where this point is, and then tighten it just a bit more, a 16th of a turn perhaps. When tightening front wheel bearings on cars and trucks back in the day or trailer bearings, I'd go zero preload and then tighten to the next cotter pin slot. Don't forget to gently tighten the pinch bolt on the nut, it doesn't take much to lock the nut onto the threads. With left and right handed nuts on those fine threads of the snout, it wouldn't come off anyways. 

Have fun with it, 2' hollows are a great investment.

 
Last edited by a moderator:
I agree with the above, especially about the need for reliefs to allow driving the races out. Many years ago I was changing the steering head bearings on my TT600  Yamaha and ran into this exact situation. None of the back side of the race was showing and the best idea I could come up with was to weld a thick washer into it so I could use the punch on that. A real PITA, but it worked...

On the topic of bearing preload, the circle track guys these days are using a custom machined sleeve in between the bearing cones so that they can crank the nut down tight but still achieve just a tiny bit of free play for minimum drag. We used to do the same thing long ago when installing bus stub axles into bug arms and converting to tapered roller bearings (those drums really needed to be tight). I was  just discussing this the other day with someone and wondering why people don't do that on the 2" hollows. Not needed, I guess, especially for the dunes but it seems like a good idea for offroad. Sort of the same idea as the crush sleeve on the pinion bearings of a 9" Ford differential.

 
LOL the crush sleeve, GM uses one too. I did so many that I had a feel for when the preload was just right by turning the yoke, then hitting it with my impact, then spinning again until it was just right. If you went too far you had to disassemble and install a new sleeve, not the end of the world but a PITA, the small forward bearing was an interference fit onto the pinion shaft so you had to drive the pinion back out. After you were all done and applied gear marking compound and looked at the pattern, if the pinion depth wasn't right you had to disassemble the entire assembly and press off the large rear pinion bearing to change the shim. I've done so many that nowadays I can usually get it right the first time. I typically measure the pinion preload with a 1/4" beam torque wrench after the pinion is installed and then again after the case and ring gear is installed, to check for side bearing preload, it's 15-30lb/in with just the pinion and 30-50lb/in with the case installed. That's rotating torque measured at the pinion nut on the yoke. Differential overhaul is an acquired skill, not something that you can teach in a classroom. 

Tapered roller bearings in a wheel hub only have to rotate while other applications have to support thrust end loading, that would be 2 different scenarios for or against a sleeve. 

Sorry for the long winded post, I have no buggy to play with this season so sometimes I get off topic. 

 
Last edited by a moderator:
Thanks for all the helpful responses.  I have installed races and bearing before, but not being familiar with the 2" hollows I thought it was better to check in with others that have experience with them before I needlessly destroyed a race or bearing.  The obvious lip there is what concerned me that it might have been a design flaw and not a typical install.

Yes, these are the cheaper Latest Rage versions, which is still a substantial investment for me and still an upgrade from my combo spindles without brakes.

I was able to get the races in this weekend with a combination of freezing them overnight and hammering on an extra race set on top of the one I was setting.  I thought I had a bearing driver set, but I couldn't find it, so I just bought the extra race from the local auto parts and used that as the driver.   This kept me out of kitchen and the hubs out of my wife's oven, so worth the price of the extra race, haha.  

Thanks KLC for the additional info regarding tightening the nut. Yes, I have a spanner wrench to tighten them. 
Like I stated before it is not a good way to do that with these hubs they gaul pretty easy and the race may not seat proper or bight not be 100% flat, Map gas torch for around 60-90 seconds and they drop all the way to the bottom and done.

Amazon.com: Bernzomatic Trigger Start Torch : Everything Else

 
Back
Top